


Welcome back to Week 3 of the $100 Room Challenge hosted by Erin at Lemons, Lavendar & Laundry! If you are just tuning in you can catch up below.
 |
| Week 1 | Week 2 | Week 3 | Reveal |
This week, I am so so so excited to share a tutorial for how I created my own wallpaper using a piece of cardboard, a foam brush and some leftover paint. The results have stunned even me!
As a side note, I took detailed videos on Instagram and saved them to a Highlight called DIY Wallpaper (click here).
As I was putting together the mood board for this makeover I came across this wallpaper. Seeing as this is a budget challenge I knew that wallpaper, in general, would be out of my price range, even in a small space like a closet. So I set out to find a way to create the look of wallpaper without the hassle or the cost.
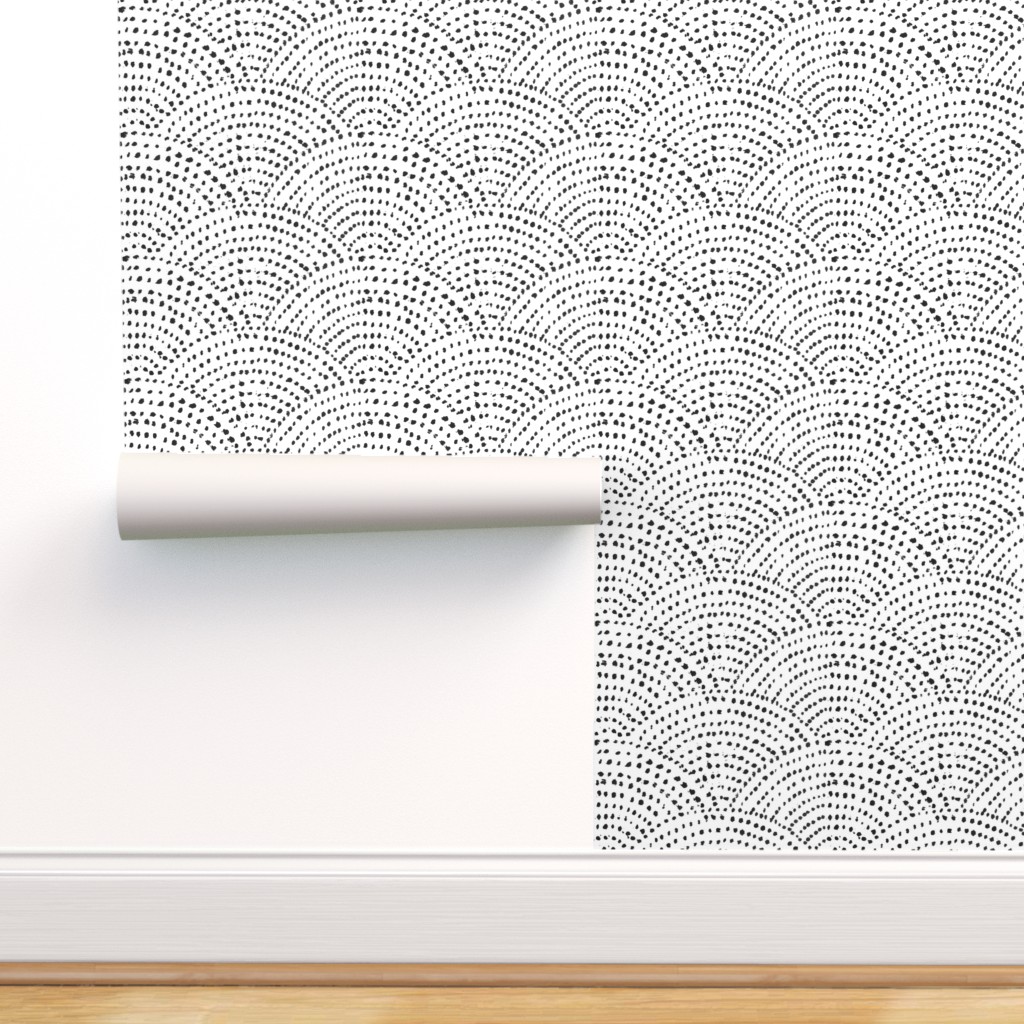 |
| This was my inspiration (from Walmart) |
I have hand-painted accent walls before like my Powder Room and my Laundry Room but never anything this intricate.
I started by simply cutting a piece of cardboard into a half circle. I used a lid from a container I have that is a perfect circle to trace and then cut it out using an exacto knife to make sure that it was even, etc. Then, I simply cut a foam brush I had to create a small little stamp, if you will.

Using some leftover black paint I took to my walls and started practicing. I knew I was going to be giving this space a fresh coat of paint so I was able to do a few practice rounds before the real thing to get an idea of the exact design I was going to go for. I really loved the dotted look but I was having trouble distinguishing the different circles so instead I opted for small little lines. I think this also makes it more my own.
Once I had my design decided and the room painted, it was time to being the process of painting the design on the whole wall.
I started by simply taping the stencil to the wall and making sure it was level (I started at the bottom right corner of the wall- which was hard to photograph).


Then, I simply moved my way across in a left to right pattern placing the semi-circle in the middle of two below.
One great thing about using cardboard as a guide is it is easily bendable. So I simply shaped it as needed in corners etc.

The rest was simply taking my time to make my way up the wall.

I started on a Saturday morning and with LOTS of breaks (#momlife), I was done Sunday morning. Total paint time was about 5 hours. I swear it probably would have taken me longer to figure out how wallpaper even works!
 |
| Apologies for the terrible lighting. It is a closet after all. |

I am just so proud of how this came together and I cannot WAIT to share the big reveal next week!
In the meantime, be sure to check out all of the other blogger's completing the challenge this month!
As always, thank you for visiting R&R at home!


11 comments
You did a great job and it looks just like the real thing. This space is going to be so nice.
ReplyDeleteHmm, I wonder if I have time to add something like this to my room challenge before next Wednesday? ;) I love this so much! It seems so simple when you describe it, but I'm so impressed with your creativity and boldness. It's just gorgeous.
ReplyDeleteThis is a brilliant application, I love the pattern and that it is paint not wallpaper. I think this is my favorite project this week!
ReplyDeleteI am so impressed with your patience! I am not sure I could have done it. It looks fabulous! Just like the mood board. I can't wait to see it in the reveal.
ReplyDeleteOMG this is BEEEUTIFUL!!!!!!!!!!!!! I admire your patience and tenacity in making this happen!!
ReplyDeleteApparently the hand painted wall paper looks so incomparable.
ReplyDeleteOh wow! It turned out so good!! Wallpapering is a pain to do so I'm sure this was much easier too!
ReplyDeleteWhat a great solution! I really like this bold pattern that you were able to make for free- just amazing.
ReplyDeleteAbsolutely incredible job! I love your ingenuity.
ReplyDeleteThis is seriously stunning! I love that it adds SO much to the space... and you did it for FREE!!! Even if you didn't have paint and a foam brush, you'd probably only need $15-20! I absolutely LOVE this and cannot wait to see this whole closet come together for the reveal!
ReplyDeleteThat's amazing Rebecca!
ReplyDeleteI was thinking the time involved would be daunting for me, but you're so right, wallpapering would take me longer too. FANTASTIC job, it's gorgeous.
Share your thoughts with me!