

So excited to share my latest DIY project! Today I am going to be sharing my very own take on West Elm's metal curtain rods!
(This post may contain affiliate links- for details read my full disclosure here)
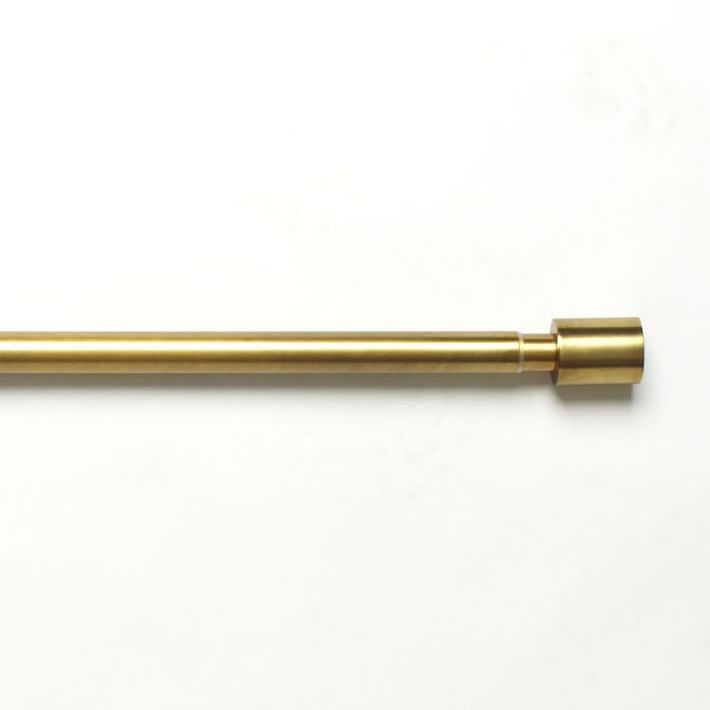 |
| Oversized Metal Rod- Antique Brass $109 |
I'm a sucker for all things 'West Elm'. Unfortunately, my home decorating budget just doesn't allow me to really shop there (however, they do have some nice sales from time to time!). Since starting my {R} Favorites Friday posts I have done a lot of on-line scouring and came across these curtain rods from West Elm and fell in love (yes, we're talking about curtain rods)!
Aren't they pretty? I just love them! But for upwards of $89 per rod this purchase is not justifiable...
Enter inner DIY goddess.
Once I decided that these would be the perfect rods to pair with my new Pom-Pom Trim Curtains I started the online search for something similar. I was really looking for a rod that had a cylinder shaped end that wasn't decorative but simple. I thought I had seen something similar at Target (confirmed: $28 per rod in silver) but I wanted to paint mine gold and I knew that Target might be pricier than I was hoping for this DIY project. I found these rods at Ikea and while they are not exactly the same they are relatively similar with the cylinder end. They also aren't gold but white is the perfect color for painting :)
 |
| RACKA Curtain Rod $8.96 |
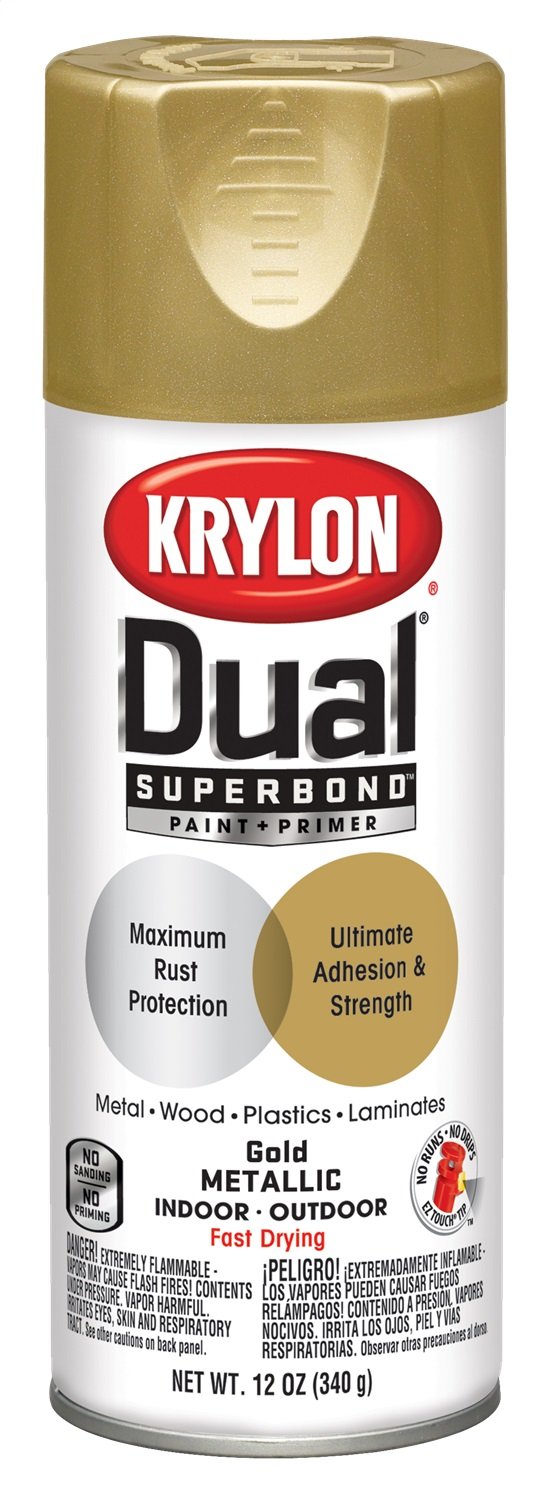 |
| Krylon Dual Paint + Primer in Gold Metallic |
Now, it was time to transform my curtain rods! Let's get started :)
Step 1: Prep your rods/Spray Zone
Luckily, I purchased my rods in white and I picked up spray paint that was both paint and primer so no priming was needed! I simply made sure that all pieces were dust free (and they were brand new so really I did absolutely nothing).

I did, however, prep my spray zone. I started by getting all my products laid out on some cardboard. I also just happened to have the perfect sized cardboard box to spray the rods completely extended (keep reading to discover my biggest blonde moment yet)!

Step 2: Paint your products
I started by spraying down all the accessories. I did light coats until I was satisfied (I had to wait about 15 minutes between coats... and am literally writing this as the 2nd coat dries).
 |
| Notice the teal leftover from my DIY Lamps last week! |
 |
| #Blondemoment |
 |
| I wised up (literally)! |
After a good three coats of paint you are ready to install and pat your DIY goddesses on the back :)


How have you re-vamped your curtain rods? Do you have any West Elm hacks to share? Let me know in the comments below :)
Thanks for stopping by to visit {R&R} at home!

Follow my blog with Bloglovin


29 comments
Looks great! I love West Elm, they have such beautiful stuff.
ReplyDeleteHi Lisa! Thank you for visiting! I also LOVE West Elm just not their prices! 😉😉
ReplyDeleteThese look great, they add a sleek touch to the decor, I love it! Great job, spray painting these would be a blond moment for me too, and I haven't been blond since I was 5! LOL.
ReplyDeleteHi Nikki! Thank you! I'm glad i'm not alone with blonde moments, haha :)
DeleteThese are gorgeous, and the price can't be beat!
ReplyDeleteHi Michelle! Thank you for stopping by! :) :)
DeleteLove your West Elm knock off, looks great (and I love your pom poms on your drapes too :) )
ReplyDeleteHi Mary Beth! Thank you! I will be posting my pom-pom trim curtain tutorial soon :) Both of these projects were so fun!
DeleteYou definitely got the look. They look great.
ReplyDeleteThank you Trish! And thank you for stopping by!
DeleteThis looks awesome! Your post has been Pinned,Tweeted and shared on Facebook! It will be featured this week on the Friday Favorites Link Party at Mustlovehome.com. Come by and see your feature and share what you have been working on this week! The doors open Thursday at 7PM. Hugs - Christine at Must Love Home
ReplyDeleteHi Christine!! Thank you so much for sharing my project!! :) :) :) I will be there at 7pm tonight to link up and share what I've been working on this week! Can't wait to see what everyone has been up to!
DeleteBeautiful! This looks so amazing. Pinned and tweeted. Thank you for bringing such amazing creations to our party. We hope to see you tonight at 7 pm because we LOVE to party with you! Lou Lou Girls
ReplyDeleteHi! I'm an editor for BuzzFeed and would love to feature this tutorial in a post! Let me know if that would be okay -- natalie [dot] brown [at] buzzfeed [dot] com. Thanks!
ReplyDeleteHi Natalie- Thank you for visiting! And, of course! My blog is meant to inspire and share ideas with everyone! I always ask that you give attribution by linking to my blog :)
DeleteThank you so much! Will always give attribution and link back. The post is live here! http://www.buzzfeed.com/nataliebrown/you-can-do-it-yes-you-can#.vjw1YRXBa
DeleteThank you!! :) :)
DeleteThis is brilliant! Also, where did you get the curtains?
ReplyDeleteHi Christina! Thank you visiting :) The curtains are from Ikea! You can see the full tutorial for the curtains here (http://www.randrathome.com/2015/08/diy-pom-pom-trim-curtains.html)!
DeleteOh, amazing! Thank you :)
DeleteI LOVE gold on navy! Could you please tell me whether there is any wear from sliding the curtains across the spray painted metal? Thank you!!
ReplyDeleteHi! Thank you for stopping by! I don't often close the curtains, as these are more decorative than used for privacy, but have not noticed any wear on them as of yet! I recommend spraying a protective gloss if you plan to open and close the curtains often!
DeleteThank you so much!
DeleteThese curtains/wraps/boards are exceptionally prevalent and broadly utilized to give an in vogue style look. These curtains are held tight drape poles. bamboo shower curtain
ReplyDeleteThey improve home style and offer flexibility in fashioner drape material. Tab top curtains are regularly made-to-arrange considering your window and would, hence, give a recognized look. bamboo beaded curtains
ReplyDeleteIn conclusion, wrap of the window ornament should likewise be considered. Net curtains are no more in design and fake silk and voiles are sought after. best orbital sander with vacuum attachment
ReplyDeleteKeep in mind additionally that the choices you make when you come to fabricate an open air grill won't just influence your family and your engaging capacity.built in grills review
ReplyDeletehttps://www.youtube.com/watch?v=rNbbLQLfdOc this can be perfect b-day gift for my little brother! he will be sooo happy when he see his coins and diamonds on max! cheers
ReplyDeleteOne great idea for your bay widow is to have two curtains on each corner and a swag in between them. These should be color coordinated accordingly. The appearance of the bay window can be accentuated with accessories such as valances.motorized blinds dubai
ReplyDeleteShare your thoughts with me!